Disclaimer: No copyright infringement intended. All rights are property of the proper artist.
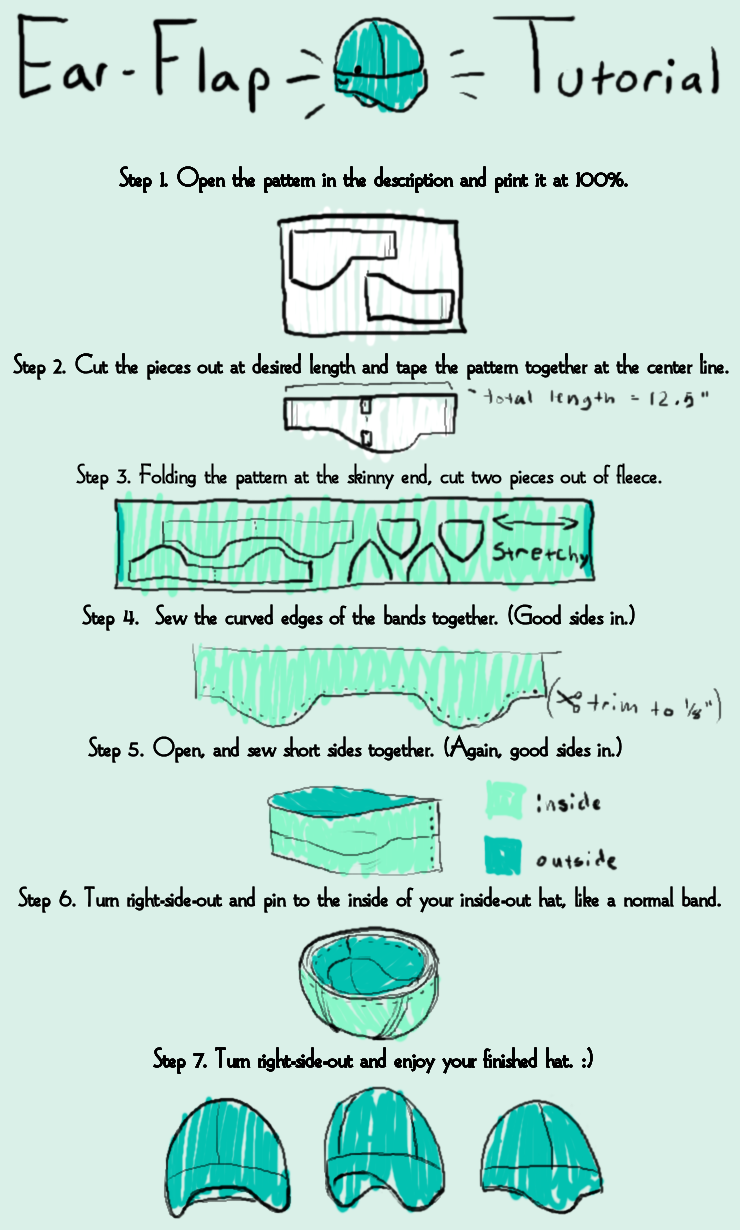
You can get the pattern here
NOTE: pattern includes a 1/4" or .6cm seam allowance. That means sew that far from the edge.
If you are one of the many people only familiar with the metric system, I'm sorry I didn't include those measurements but here is a wonderful conversion tool.
Now this is just a basic hat so you can embellish it however you want.
First sew the short edges of the band together, forming a loop. Then fold it the long way with the seam inside so you have a double thick loop. Take your main hat part and turn it inside out with the seams facing out. Turn the hat upside-down like a bowl! Now, take your double thick band with it's two raw edges facing up, and place it INSIDE the hat so that those two edges line up the the edge of the hat. Pin it together starting with the seam of the loop lined up with the back seam of you hat. Then fold it in half and pin the front, and then the sides and in-between. Then you're going to sew the tree layers together at the top. When you've finished, take out your pins and fold the brim down, and turn the hat right-side-out again to finish.
In essence, all you're really doing in the last step, is sewing the brim to the bottom of the hat in a way that hides the seam on the inside.
Green is wire, red is stitching, and tan is masking tape.
Have large ears/horns/other things sticking up out of your hat that are just sadly flopping over? Try adding some wire!
I use gauge 20 steel wire for most everything. It's thick enough to hold your stuff up, yet thin enough you can bend it with your fingers.
You'll usually want to add your wire after you've finished sewing your hat. Simply measure out enough wire to go inside both ears plus about 20 inches extra.
Find the middle of your wire piece and place it on your center seam. Then make two bends where the inside of the ear starts.
Then take and end and push it in between the stitches into the ear. Then push it back out on the outer edge of the ear. Do the same for the other side.
While holding the inner bend in place, push the long wire end into the ear until it loops up and fills the whole inside. Then bend the long end towards the back of the hat. Do the same for the other ear and then pinch the wire into shape as needed.
Form a small loop in the back with the two ends and twist them together in the middle. Cut of the excess and make tiny loops on the ends so they won't be sharp.
With a needle and thread, stitch through the inside seams, wrap around the wire and tie off at bends to hold the wire in place.
If you like (especially useful if you have long hair) Carefully cover the wire twist with masking tape.
And there you go, now you can add those inches to your height!


No comments:
Post a Comment