Here we're going to try to make Sheryl's mike with a styrofoam rod and some lionboard! You should be able to get your hands on the styrofoam rod at your local home center or hardware store, you can choose whatever size best suits you. Just be sure to choose something that you'll be able to wrap the lionboard around (in other words, take into account the thickness of the lionboard when choosing your rod).

Materials list:
1. Lionboard2. cutter knife (razor pen)
3. sandpaper
4. stryofoam rod
5. glue gun
6. carpenter's glue
7. gold wire
8. spray paint (laquer) in gold
9. top coat (glossy finish)
Step 1. Cut and lay out your lionboard

First cut the lionboard as shown in the diagram. Make sure you cut enough "D" parts to cover the whole circumference of your mike.
Step 2. Sanding

Step 3. Cut the mike head

Step 4. Stick the lionboard to the head

Step 5. Stick the lionboard to the body of the mic

Attach piece E to the bottom end of your mike then wrap the D pieces diagonally around the styrofoam rod, gluing as you go. Cut the last piece to fit.
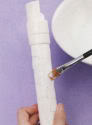
Step 6. Seal with glue
Step 7. Make the antenna

Step 8. Seal the antenna with glue

(Not mentioned, but shown: a small piece of lionboard has been used to tip/hide the ends of the antenna and hold the wire together) Repeat the process from step 6 with your antenna. Dry and repeat multiple times.
Step 9. Paint with gold spray paint

When the glue has completely dried, spray both the mike and the prop with gold spraypaint. Repeat the process several times to make sure the paint doesn't shrink or fade.
Step 10. Attatch the antenna to your prop

Step 11. Spray with a topcoat

Source: cosplay.com
No comments:
Post a Comment